After a good nights sleep and a day of getting the kids to school, gardening and good old housework, I have for you my 5th (and possibly final) entry for the Winnie and Walter Belated 2nd Birthday Bash Challenge.
This time I joined the wonderful Heather P. and her colour challenge. She is wanting us to create a project with Lime, Coral and Aqua. Its not a combo I've used before but I'm always up for a challenge:
I haven't done much in the way of stamping for my W&W challenge cards, so thought it was about time I got out some ink pads and had a go!!
I absolutely love the floral stamps of the set Winnie and Walter 'In Bloom: Lola's Bouquet with Joni Andaya', especially all the little detail stamps. I managed to find three Hero Arts ink pads that are close to the colour combo, so I stamped away all over my card front. I also used some black to add some detail and contrast.
Using the W&W 'hugs' die, I die cut the word out of the card front and added a panel behind it. I die-cut the 'hugs' from black CS and white CS. The black die-cut was inlaid into the card front, I glued the white and stamped die-cut together and then adhered it slightly above the black. I then stamped the sentiment (from W&W 'The Big, the Bold and the Happy') on a small piece of white CS and glued to the card front. And of course I added some sequins for sparkle, aqua and clear from Pretty Pink Posh and coral from Neat and Tangled.
This card actually fits into four of the other Winnie and Walter Challenges:
Create your own Background with Gayatri
Over the Edge Challenge with Kelly
Floral Challenge with Lydia
Inlaid Die Cutting with Mayuri
I'm also going to link to two other challenges:
Simon Says Stamp - Wednesday Challenge
Simon Says Stamp - Work it Wednesday - February (Floral)
Wow, that's ALOT of linking, hope I don't forget any of them!!! I have 26 hours before the challenges finish and the only challenge I haven't joined is the 'Two Challenge with Shay'. Will have to see what I can come up with tonight....
Take care
Shona
I promise this is my last post for the evening!! I seem to have a habit sometimes of no posts for a while and then a million at once! My husband says I've always been an 'all or nothing' type of person, maybe he's right (but don't tell him that....).
This is my fourth entry to the Winnie and Walter Belated 2nd Birthday Bash Challenge and this time I'm joining Kate Capper's challenge to design 'Anything but a card'. To be honest, its not very often I make anything else apart from cards. It took a few days to come up with an idea but its one I think I will be making many times more:
This was so hard to photograph but suddenly realised leaning the tag against something was much easier than trying to hold it myself AND try to take the photo.....
I die-cut the multi-faceted star from white CS and also using the solid star die. At the same time, I also die-cut the faceted star from some white craft foam. I then used my mini-blending tool and five different colours of Distress Ink to create a rainbow effect on the star, making each point its own colour and blending in the middle. This was then glued to the foam piece, and then to the solid star. I heat embossed the sentiment in white on a tiny piece of black CS and glued to the front. A piece of gold thread was adhered behind the star to give it something to hang from.
I'm so happy with how this turned out and Phoebe loves it so much, she wants me to make a lot more for her room and to put on any presents we give to people during the year.
The multi-faceted star and solid star dies are from Winnie and Walter, as well as the sentiment from 'The Big, the Bold and the Happy'.
I have three other challenges I would like to enter:
W&W Belated 2nd Birthday Bash Challenge with Vanessa (Rainbow)
Inkspirational Challenge # 103
Simon Says Stamp - Wednesday Challenge (Anything Goes)
I'm off to bed, yippee!! Just need to tidy up my mess first, all this die-cutting with multi-faceted dies has left millions of tiny triangles all over my carpet. How I wish little 'craft angels' came in the middle of the night to clean up everything I've dropped. One can only dream......
Take care
Shona
This is entry number three for the Winnie and Walter Belated 2nd Birthday Bash Challenge. I was hoping to create an entry for each challenge but time seems to be slipping by but will keep trying!!
This time I'm joining the fabulous Vanessa Menhorn and her 'Rainbow' challenge. She is wanting us to create a project using whatever you like to make it rainbow coloured in some way. I love a good rainbow and had an idea straight away of what to make.....:
I created my 'pastel rainbow' by brushing different coloured Distress Inks across a piece of water colour paper with a wet brush, making sure they slightly overlapped. I then die-cut the faceted rectangle from it and also from a piece of white foam. I glued the rainbow piece on to the foam, which gave it a lot of dimension without having to cut out millions of tiny pieces of foam tape. Laura Bassen had this idea (to die-cut foam) in one of her videos recently and its changed my life!!
I cut a panel of gold glitter CS and adhered it over the card front. I then glued the rainbow panel over top. After die-cutting the 'hello' from some gold glitter CS and twice more from white CS, I glued them all together with the gold piece slightly higher. This was then adhered to the card. Its so hard to capture the glitter of the gold in my photos but its sitting here beside me glistening away.
The 'hello' die is from Winnie and Walter, as well as the Multi-Faceted Die. The gold glitter CS is from American Crafts.
I have four other challenges I would like to enter:
W&W Belated 2nd Birthday Bash Challenge with Gayatri (Create your own background)
W&W Belated 2nd Birthday Bash Challenge with Heather H (Gold with Watercolour)
Inkspirational Challenge # 103
Simon Says Stamp - Wednesday Challenge (Anything Goes)
One more post and then I'm off to sleep. Its not supposed to be so hot tomorrow, which is great because I have a lot of gardening work to do. Everyone seems to be doing well health wise too at the moment (touch wood) so hopefully I will also have no sick children this week!!
Take care
Shona
I've been working very hard trying to catch up with my challenges and DT commitments, while also having fun in the sun with the kids. We spent this afternoon at the beach and had so much fun catching crabs, building sandcastles and swimming. I'm exhausted now but I'm running out of time to join in the fun for the Winnie and Walter Belated 2nd Birthday Bash Challenges.
This time I'm joining in with the lovely Taheerah's challenge where she has this beautiful photo for inspiration:
I really enjoy photo challenges because its so interesting to see what each person picks out of the image. The first thing that struck me was the carpet and its geometric pattern. I knew that would be the base for my design. Now how would I create it:
This took quite a long time to put together but was so fun playing with all the different elements. I started off by stamping and heat embossing the geometric stamp in white on some water colour paper. I then spent AGES using my black Zig brush marker to colour in each diamond shape. Tedious but worth the time.
I loved the paneling on the walls, so used some rectangle dies to create two sizes of frames around the geometric pattern and this was all adhered to the card front. The beautiful pink flower on the coffee table next caught my eye, so I stamped it twice on water colour paper with two different colour Distress Inks, and used a wet brush to colour them in. Once I fussy cut them both I adhered them to the card.
I also liked the rose gold colouring of the glasses on the table and remembered I had some embossing powder in a similar colour. So I die cut the 'happy' 3x from white CS, heat embossed one of them, then glued them all together. This was then adhered across the card. I also stamped the 'birthday' on a tiny piece of white CS and heat embossed in the same rose gold colour. A few sequins in pink and clear finished it off with a bit of sparkle.
The geometric stamp is from W&W Mini Scenery 'Do you see what I see?'. The 'happy' die is from W&W, as well as the flowers (from 'In Bloom: Addie's Garden) and the 'birthday' (from 'The Big, the Bold and the Happy'). The sequins are from Pretty Pink Posh.
I have three other challenges I would like to enter:
Simon Says Stamp - Wednesday Challenge (Anything Goes)
Seize the Birthday Challenge
Inkspirational Challenge # 103
I have two more projects to post before I can sneak off to bed. Luckily its still very warm, so that's keeping me awake, although the mozzies coming through the window are getting very annoying......
Take care
Shona
Hi everybody, popping in quickly to remind you about our current challenge at TIME OUT!
Its a 'Home Sweet Home' challenge and this is the inspiration photo. You can be inspired however you like. Maybe with the colour scheme, the room itself or maybe by the photos printed on the fabric. The choice is yours!!
I really wanted to play around with the 'french' side of things as I keep seeing the Eiffel Tower print on the back pillow. So I rummaged through my patterned papers again and you wouldn't believe what I found:
I can't believe I was lucky enough to find two different papers that worked perfectly for this challenge. Maybe its telling me I should use papers more often......
I came across this paper from October Afternoon 'Travel Girl' that has an old-time street map of Paris. I cut a piece slightly slimmer than my card front, made sure it had the Eiffel Tower on it and popped it up with foam tape on the card. Now while I was going through the 'Travel Girl' collection, I found the sticker sheet that came with it, and there was this gorgeous wee 'french' doggie. Its extremely rare for me to use stickers on my cards but I couldn't resist, so he was popped up on foam tape as well.
It was then I remembered that I had one French language stamp somewhere, and after a lot of searching I found it. Its from a Fiskars set called 'Say What?'. I stamped it on a small white CS banner and glued it behind the doggie. And that was that!!
I going to link this to the Simon Says Stamp - Wednesday Challenge where their theme is 'Anything Goes'.
You have until next Wednesday March 2nd to link your projects to the TIME OUT challenge and the rest of the Design Team have some more creations on the blog to give you some ideas. Looking forward to seeing your designs in the Gallery!
Take care
Shona
Hi everybody and welcome to a new challenge at Addicted to Stamps and More! Our theme for this weeks challenge is:
This means you can get out your pencils, your markers, your Distress Inks, your brushes.....basically anything that you can use to colour your project. The choice is yours!!
Our Sponsor for this challenge is Robyn's Fetish Digital Stamps and More and they are giving a prize of 3 digital images to the winner. Woo hoo!!
Twelve months ago this theme scared the **** out of me as I wasn't confident with my colouring skills at all. I'm still not that good but have learned a lot since then and enjoy getting out my pencils etc. Here is what I came up with this time:
I was very lucky to get hold of some of the new Waffle Flower Crafts products ahead of their release today February 24th and couldn't wait to play around with them!!
I started off by stamping the flower, sheep and butterflies on white CS and colouring with my pencils. I then carefully fussy cut them all out. After die-cutting the white scalloped frame twice from white CS, I drew a faint pencil line around one, so I knew where it would sit on the card front. This way I could use my mini-blending tool and some distress inks to create the grass/sky scene on the card.
Double-sided tape was used to adhere the scalloped frames together, slightly offset, and then to the card front. I then used a mixture of tape and glue to add my pencil coloured pieces to the scene. And of course I added some sequins for a bit of sparkle!!
The Inverted Scallop Circle Dies are from Waffle Flower, as well as the flower, sheep and butterflies from stamp set 'Welcome Spring'. The sequins are from Pretty Pink Posh.
You have until next Wednesday to link your creations to the Addicted to Stamps and More! challenge. And the rest of the Design Team have some incredible projects on the blog to spark your imagination. I can't wait to see your ideas in the Gallery!!!
Take care
Shona
I can't believe the Winnie and Walter Belated 2nd Birthday Bash Challenge has been going on for nearly a month and I'm only now having a chance to sit down and create for it!! Better late than never but why do I leave everything to the last minute!!
For this first entry, I'm joining in on the Inlaid Die-cutting with Mayuri challenge as its one technique that I love to do the most!! I decided to get very fiddly and tricky and this is what I came up with:
For this card I wanted to see if I could inlay the die-cuts if I went off the edges, especially off the top edge and see what happens. I think it worked out but took a bit of brain power to pull it together.
I worked out on my card front where I wanted to die-cut the 'star' (which is from Winnie and Walter) and used the solid star die to cut them out. To do the top one, I laid the card out unfolded and put the top cutting plate aligned with the fold so it didn't cut any further into the back panel. I then glued a panel of acetate to the back of the card front, which would give the die-cut stars something to sit on and stick too.
Firstly I used my mini-blending tool to colour some white CS with Distress Inks - Picked Raspberry, Wilted Violet and Worn Lipstick, before die-cutting the faceted stars. And then using tiny amounts of liquid glue on the back of the stars I inlaid them in place against the acetate. Once dry I was able to cut off any overhanging pieces from the card edge.
I die-cut the 'happy ' (also from Winnie and Walter) twice from white CS and once from silver glitter CS. I glued the two white ones together and then the glitter on the bottom, slightly off-set so it could be seen. I then die-cut the happy from some white craft foam, glued it to the back for some height and adhered to the card front. And after stamping the 'birthday' (from W&W 'The Big, the Bold and the Happy') on a small piece of white CS, I adhered to the card. And of course I added a few clear sequins from Pretty Pink Posh for extra sparkle!!
I'm also going to link this to the Winnie and Walter Belated 2nd Birthday Bash Challenge - Over the edge with Kelly since I have all three of the stars going off the edges and even the top fold of the card.
There are nine other challenges you can enter with the Winnie and Walter Birthday Bash and I only have about one week till it finishes, so better get a wriggle on!! Wish me luck!
Take care
Shona
Its been a very busy few weeks here with a lot of sick children around the house. Luckily neither Dave or I have succumbed (touch wood) and the kids are gradually getting better, so hopefully we will be germ free for at least another week or two.......
This has meant not a lot of card making has been going on and I've missed out on a lot of challenges I wanted to enter. Last night though I was determined to do a bit of colouring and managed to turn it into a card.
This is the inspiration picture for the current Sparkle and Shine challenge. The rainbow colours got my attention straight away, so I stayed up till 12.30am last night doing rainbow colouring with my Ziggies:
Unfortunately I didn't have any way of making the pattern in the inspiration photo, so went with a patterned background and included the grey in the frame and banner.
I started off by stamping and heat embossing the faceted background stamp in gold on a piece of water colour paper. I then used my Ziggies along with some water and small brush to add the colour to each triangle and drag it out with the brush. While it was drying I die cut the frame from a piece of grey CS and twice from white CS. I glued these all together with a piece of acetate in-between the top two layers.
I added lots of foam tape to the back of the frame and made a pile of round and star shaped gold sequins on top of the coloured piece. The frame was adhered over the sequins and I trimmed off any excess water colour paper. This shaker was then adhered to the card front. I made a small banner from the same grey CS, stamped and heat embossed the sentiment in gold and used double-sided tape to stick to the shaker.
The frame die is from Pretty Pink Posh, as well as the gold round sequins. The sentiment and background stamp are both from Neat and Tangled 'Faceted'.
I have two other challenges I would like to enter:
Little Tangles Challenge # 65
Simon Says Stamp - Wednesday Challenge (Shake it Up)
I have one more card to post and then its off to bed. It was Phoebe's 11th birthday today and she was sick with a migraine. Not the best way to spend the day but we got to spend the day together watching dvd's and eating chocolate, so not too bad after all.
Take care
Shona
Happy Friday everybody and welcome to a new challenge at Just Add Ink!! We have the most Summery photo to inspire you this week:
Watermelon's are such an iconic Summer fruit and the green and pink colour combo is divine. The Gallery is going to look very refreshing and pretty this week!!
I happened to have a watermelon stamp that I have never used and I wanted to get back into my colouring for The Daily Marker - 30 Day Colouring Challenge, so my pencils came out to play:
I had to stay home with Max yesterday as he caught Phoebe's cold (she was sick over the weekend and Monday), so it gave me a chance to colour away and watch a movie. After I finished I fussy cut them all out and adhered them in a fanned circle pattern on the card front. I used a Couture Creation circle die to cut some vellum. I stamped the sentiment and heat embossed using black embossing powder. This is probably only the second time I've used black and you have to be so careful with random bits melting in the wrong place but I wanted the words to be shiny. I used some double-sided tape to put the sentiment in place.
The watermelon and sentiment stamp are both from a Kelly Purkey stamp set 'Summertime'.
I'm going to link this to the Simon Says Stamp - Work it Wednesday Challenge where their theme is 'Something New', which is the stamp set.
You have until next Wednesday to link your projects to the Just Add Ink challenge. The rest of the fabulous Design Team have some beautiful projects on the blog if you need any help with ideas. I can't wait to see what you make in the Gallery!!
Take care
Shona
Hi everybody and welcome to a new challenge theme at TIME OUT! Thank you so much to everyone who entered our last challenge, the Gallery was overflowing with beautiful cards and it will be so hard to chose a winner!! We have a photo to inspire you this time:
HOME SWEET HOME
From having a Gallery filled with colourful flowers, this next Gallery will be a wonder of black and white. You can be inspired by any part of this picture, maybe travel, the world, bedrooms etc...its totally up to you!!
Our Guest Designer joining us for this challenge is my fabulous crafty friend Cornelia from Fun Stamping (Stempel Spass). You will certainly have seen Cornelia's cards around blogland. She wins many challenges and belongs to several Design Teams too. I love her creations and she is a lovely person as well, so you could say she is the complete package!!
I immediately thought of black and white for my card when I saw this photo, and then I started noticing the different cities mentioned on the pillows etc. So an international card was born:
Hard to believe I know but I have some patterned paper as the star of my card!! I love the small paper pads and have quite a few but my designs don't use them often. I was flicking through them for this challenge and came across this paper from Basic Grey 'B-Side'. All of the different languages on it was perfect for the challenge, so cut a piece as large as the card front and adhered it.
I went with the idea of someone going away and missing them or maybe family or loved ones lived overseas that you missed. I didn't want to cover up too much of the paper, so I die-cut this frame from Pretty Pink Posh from black CS 3x and glued them together. This was adhered over the paper. I then stamped the sentiment (from Concord and 9th 'Map Love') on a circle of white CS, using a die from Couture Creations. This was popped up on foam tape. Its a pretty simple card but I love how it turned out!!
You have two weeks to link your projects to the TIME OUT challenge and of course the rest of the fabulous design team have created some projects on the blog to get your imaginations going. Can't wait to see you in the Gallery!!
Take care
Shona
Hi everybody and welcome to my inspiration post for our current Waffle Flower Challenge for
February. We have a stunning challenge photo for you this month, a
technique that is one of my favourites and a sketch to help with any
ideas:
Inlaid
die-cutting is one technique that I would do the most when it comes to
my card designs. It can be incredibly fiddly but is so rewarding to have
a complicated pattern but still be a one-layer card!! I so loved the
colours from the photo, so that's where the idea for my card started:
To
start off, I die-cut the middle square and circles from the card front.
I then used the same die (but only used one circle) to cut a circle
each from the four different coloured paint chips. I put the coloured
circles in place and held them there with washi tape behind them.
For
the next part I cut the more delicate frame from the card front. I
slowly removed the die to keep all the pieces in place. I used a piece
of Glad 'Press n Seal' over the front of the card. This meant if any of
the pieces wanted to fall out, they would be held in place on the Glad
sheet. Its amazing stuff and I really recommend it for this technique!!
I
carefully flipped the panel over and adhered a panel of white CS
slightly smaller than the card front. This gave something for all the
die-cut pieces to hold on to. Once I was sure all the pieces were being
held by the glue, I removed the Glad sheet. Now all I had to do was
remove the washi tape and glue the square and circles into place.
After
die-cutting the 'Perfect' from gold CS 3x and gluing them all together,
I adhered it to the card. I also stamped the rest of the sentiment on a tiny piece of white CS and glued as well. And of course I had to add a few gold sequins to bring out the shine!!
The square and intricate outside die are both from the same Waffle Flower set 'Doily Square Die'. The 'Perfect' word die is also from Waffle Flower, as well as the sentiment from the stamp set 'Congrats'. The sequins are from Pretty Pink Posh.
You have until February 25th to link your projects to the Waffle Flower Challenge.
Please remember that you don't need to use Waffle Flower products to
enter, you still have a chance as our 'Random Winner' to win a Waffle
Flower stamp set of your choice!! I hope to see you in the Gallery!
Take care
Shona
So much for thinking today was a bit cooler....its so sticky and the wind is very warm. Might need a trip to the school pool later....
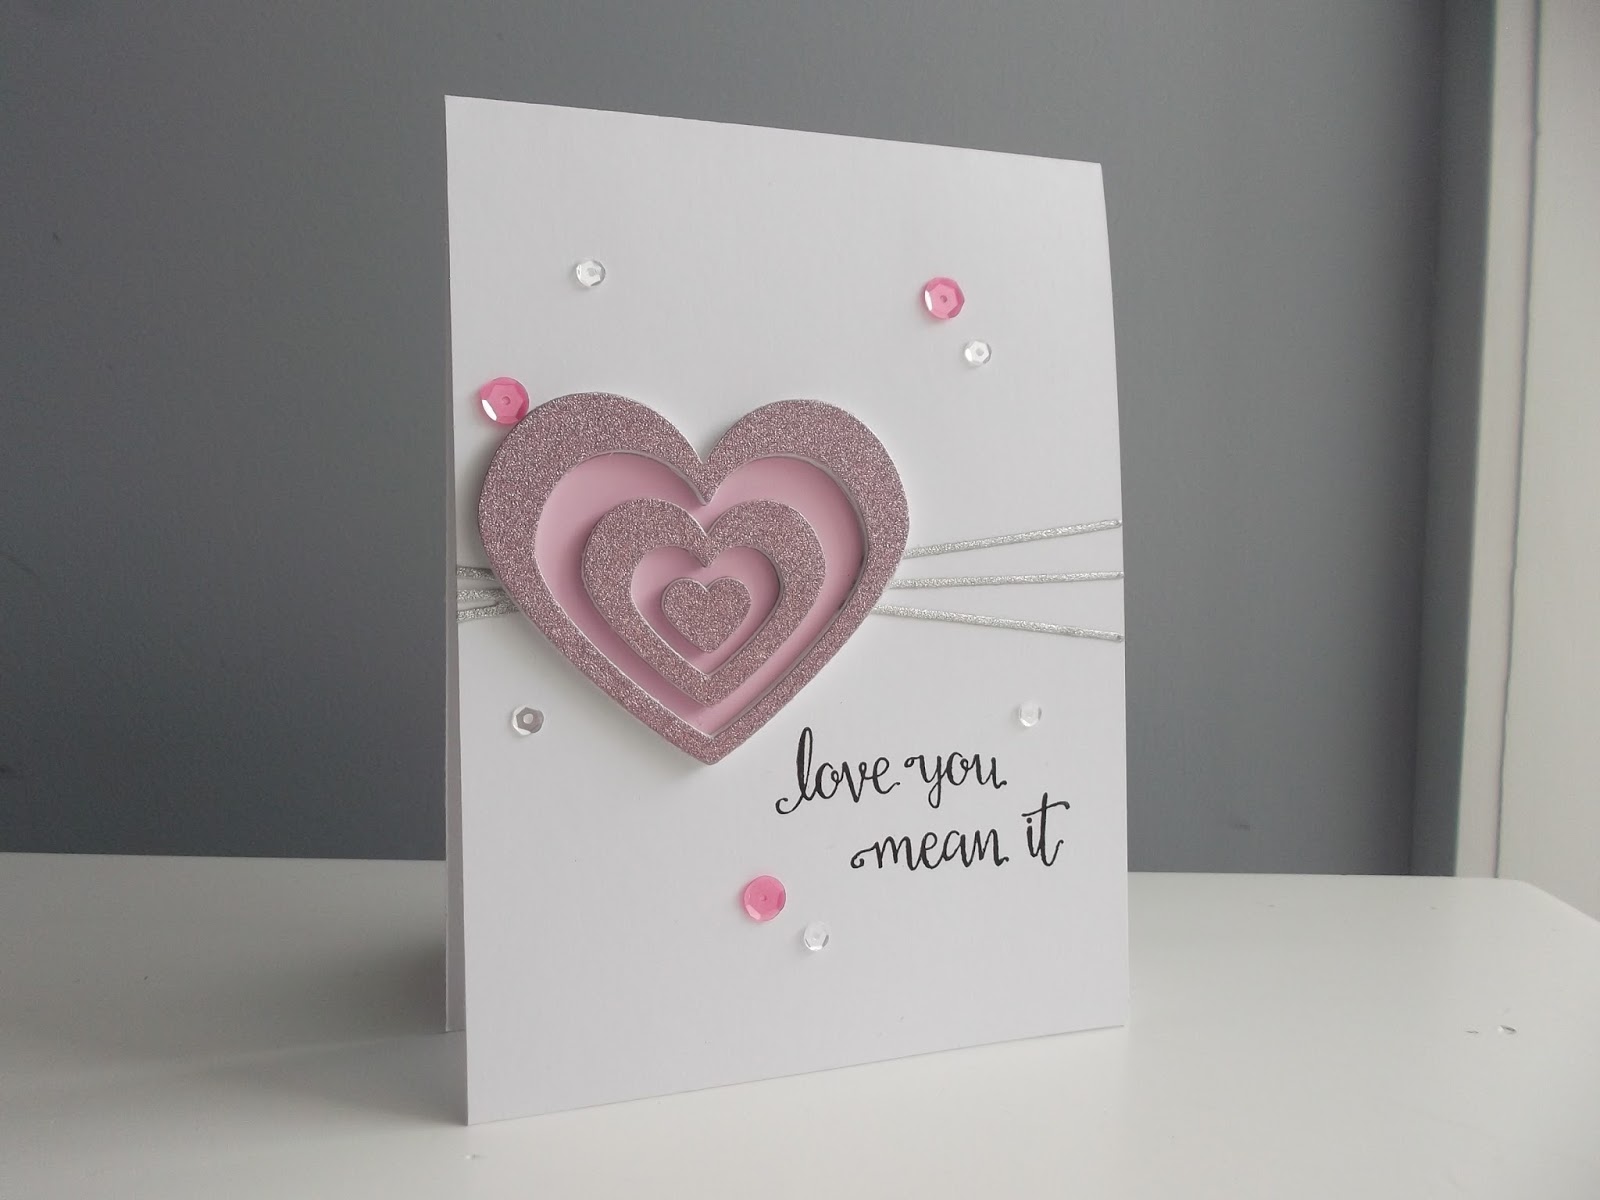
This is my third and last entry to the Pretty Pink Posh - Valentine Challenge. Paulina gave you these four amazing Valentines cards to choose from and create your own design.
This time I chose Lisa's card (top left) as I loved the layout. I'm not very good at using ribbons on my cards, my bow-tying ability is severely lacking, so I had to come up with another idea:
I started off by die-cutting the 'twine' from silver coloured glitter CS and gluing to the card front. I then die-cut the 'hearts' from pink glitter CS and a similar coloured pink paint chip. I had already cut the hearts from some white craft foam, so I glued the pink glitter hearts on top and then alternated gluing them and the paint chip hearts over the twine. The sentiment was stamped in black and I added clear and pink sequins for a bit more shine.
The 'twine' die and sequins are from Pretty Pink Posh. The 'hearts' die is from CAS-ual Fridays and the glitter CS from American Crafts. The sentiment is from Concord and 9th 'Love you. Mean it'.
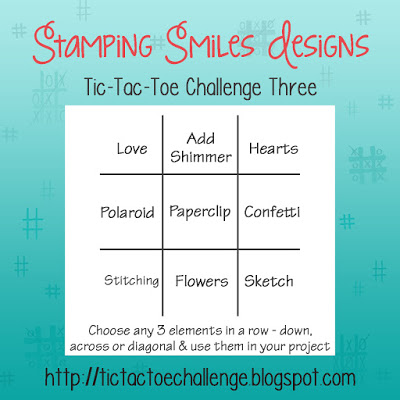
I have five other challenges I would like to enter:
Tic Tac Toe Challenge # 3 (I used the first line across)
Simply Create Too Challenge # 102 (Love or Valentines)
CASology Challenge # 184
CAS on Sunday Challenge # 76 (Valentines)
Stamplorations CAS Challenge - February
Now I just need to work out what to make for dinner. Has to be something quick and doesn't require much heat to cook it, as standing in the kitchen with the oven and stove-top going turns it into a sauna in this heat!! Maybe I can suggest ice-cream sundaes again......
Take care
Shona
After a very hot weekend, its slightly cooler and more cloudy today. I was supposed to be gardening all day but Phoebe has been sick with a head cold all weekend and was still looking awful this morning. So we have been spending the day together watching 'Kate plus 8' (Phoebe's new favourite programme, not one I really enjoy......), Project Runway and Divergent, while I've been doing jobs and working on some cards....finally!!
I've been thinking about the Pretty Pink Posh - Valentine Challenge ever since Paulina announced it. You can enter up to three times and I had only made one card but I was running out to time to make more. So todays 'sick day' couldn't have come at a better time!!
For this challenge you had to choose one of the four Valentine's cards and be inspired to make your own creation. I loved Joni's card with the baby birds (on the end) and the use of the Stitched Border 1 Die with the sequins attached. And as I had that border die, I decided to grab out my paint chips and go to town:
I rummaged through all my pink paint chips and came up with five coordinating into an ombre effect. I used the stitched border die on each and adhered them to each other with glue tape. I then added them to the card front, leaving a small strip of white CS on each side. I die-cut a circle of white CS and heat embossed the sentiment in gold. This was then popped up on foam tape. After die-cutting the bows from gold CS, I glued these to the card along with gold and pink sequins. So happy with how it turned out, hope Paulina and Joni like it!!
The bow dies are from Pretty Pink Posh, as well as the pink and gold sequins. The sentiment is from Honey Bee Stamps 'Beautiful Life'.
I'm going to link this to the Simply Create Too Challenge # 102 where their theme is 'Love or Valentines'.
I need to go and pick up Max from school now but when I come back I will post my third entry for the Pretty Pink Posh challenge, with only a few hours to spare........
Take care
Shona